Question: How to configure Click and Install Applications with Hosting Controller v10?
Answer:
Below instructions demonstrate the process of enabling the Click and Install Apps pack. The pack works for both Windows and Linux web servers.
1. To configure Click and Install Apps, login to the panel as admin user, click Configuration icon on the top right corner and proceed to Click and Install Apps option under Application Conf.
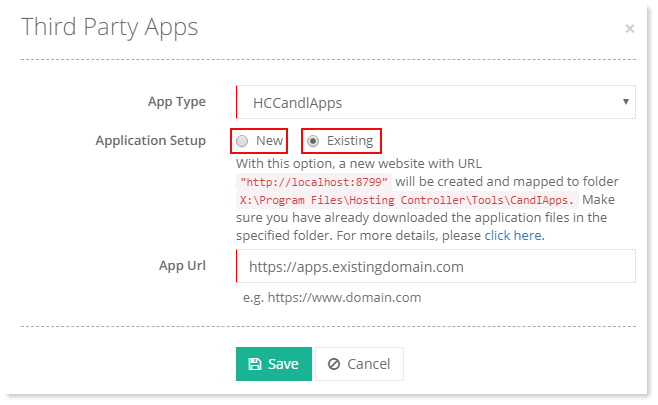
2. On next screen select HCCandIApps as the App Type
3. Download Click and Install setup folder from this
link , extract the zip file and place folder
CandIApps in HC10 installation folder at location
C:\Program Files\Hosting Controller\Tools
4. Go back to Click and Install Apps page in HC interface. Click and Install Apps need an administration site in IIS to work. This site serves as a web application for installing various click apps on websites. This site can be a
New or an
Existing one.

New: If you select the "New" option HC will automatically create a new site with the name "HC Click and Install Apps" in IIS and point its physical path to C:\Program Files\Hosting Controller\Tools\CandIApps. Later a host header may be set against this site in IIS to point it to any other desired URL.
Existing: If you select the "Existing" option HC will allow you to set administration URL on an existing site or its virtual directory. Provide the existing site and point its physical path to C:\Program Files\Hosting Controller\Tools\CandIApps.
That's it ! You have configured Click and Install Apps Pack successfully. Now proceed to enable the apps.
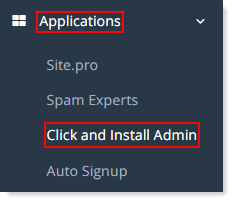
5. To enable Click and Install Apps, from the left menu click Applications and then Click and Install Admin.

6. This opens the administration URL for Click and Install Apps. Individual apps such as WordPress, Joomla etc. can be downloaded from HC's servers here.
7. To enable an application for an individual website, go to the left menu and click Provisioning and then Websites. From the site Dashboard enable the desired apps on the website.